Helping kids to have a better day of riding.
- Apr 13, 2017
- 5 min read

On a recent ride I took notice of how several kids bikes were set up and two things immediately jumped out at me. So I thought to myself about how to address this and to hopefully give parents, adults, or friends some help and guidance in possibly addressing the issues. Kids bikes are like adult bikes and are not one size fits all they should not be treated as such. Manufacturers design, spec, and build bikes to fit as many people as possible and to do this they use the averages. It is the customers job to buy aftermarket parts to make the bike fit better, or to change the spec to suit their style better. A child’s bike is no different and certain things might need to be changed. Let’s quickly address one thing before I get into what I want to talk about. If you want a child to be happy on a bike then above all make sure they are on the right size bike. Too often I see kids on bikes that are either too big or too small for them. This makes the experience difficult for the child and definitely isn’t going to make them feel safe or as much fun as it could be. Many parents say that their kid will grow into it, and they probably will. In the interim see if you can borrow a bike for a few months or maybe even look for a used bike that you can resell or donate when they are ready to move on.
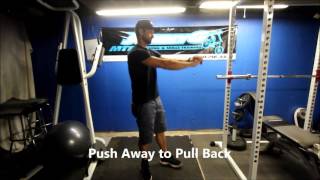
The two things I want to talk about today are handlebar width and seat height. I am a major advocate for a handlebar that fits properly and allows a rider the best range of motion, power, and body support. I will include a link to a video at the end of this article. The majority of bars I see on kid’s bikes are too wide. There are two important reasons why this is bad for their riding. The first is that it causes their small upper body muscle to work overtime. Instead of being able to lean into the bar they have to use more muscles to keep them from collapsing forward. Here is an example of what I mean. When the arms are under the body we can use them to help support the weight of the body. I call this stacking the arm. It allows alignment from the shoulder to the hand, making it stronger. When we take the arm out from under the body, and move it outside, you can see how we lose the stacking, and line of strength. This will lead to muscle fatigue because they are using muscle that they don’t need to. Our legs should be responsible for our body weight and tag team with the upper body for steering, pushing, and pulling. There are even more benefits to a bar width that fits the body. It allows an increase in arm range of motion which means more arm suspension to absorb the trail. The additional arm length also allows body weight to be placed further back over the rear wheel with the ability to maintain a better upright posture. (Rather than lengthening the torso which typically lowers the chest)

The other downside to bars that are too wide is that they make the body move more than it has to. When bars are too wide for a child they tend to have to steer with their torsos and shoulders rather than just making smaller movement with their arms. This is important because it means that it is harder for them to turn the bike which also results in a decrease in bike control. In the pics below the bar that is narrower can turn an additional 5 degrees just by being a few inches shorter. Now 5 degrees might not seem like much, but we typically only use 20-25 degrees so we are talking about gaining one quarter more to our steering and front wheel movement. Handlebars are the source of bike control and can either hinder or advance riding.


The second thing I want to address is seat height. (Referring to children who are on trails and pedaling distances) Now I am well aware that seats are run at a lower height in order to make a child feel safer and I completely understand. (Many adults do this as well) It’s a GREAT starting point that allows confidence to be build and for progress to begin. I’m simply trying to get riders past this point and progress to be able to use their entire leg musculature, save energy, and have a riding experience. To help with this I recommend slightly raising the saddle throughout a ride or before the ride. Doing this in small increments will make it seem less noticeable and the idea will seem less dramatic in their minds. You do not need to tell them you are doing it, just do it in small increments such as 3-5mm at a time. I do think that this is something that we should be adamant about. I say this because of how often I see a child on a bike and I can’t even imagine how uncomfortable it must be or how much power and energy they are losing by not being able to properly propel the bike. This leads to them fatiguing quickly, shorter rides, and possible injury. If small steps are taken they will come to know and feel the difference and will understand how important it is.
I would like to talk about one other downside to a seat that is too low. It places the arms, wrists and hands in an awkward position and can lead to a decrease in the body’s ability to absorb the trail from a seated position. It’s important to know that most new riders do not get out of the saddle. They just coast over rough terrain. Trust me, as a cycling skills coach I can’t even recall how many times I’ve had to tell someone to get off the saddle. In the pictures below you can see the difference in saddle height and how it affects my body. I call this a neutral riding position. In the picture on the left I have no real ability to absorb the front end of the bike with my body. This is because in this position my arms can’t muscularly absorb. I can only steer and hang on. In the picture on the right my arm angle completely changes. When my elbows come up I can now engage the muscles in my arms giving me the ability to push or pull. You can also notice the difference in leg extension. In the picture on the right if I rise slightly off the saddle I can begin to absorb the trail with very little effort. If I moved that same small amount in the left picture my legs would tire very quickly.

I hope everyone has enjoyed this article and I thank you for reading it. We are all sharing in a sport we love, so let’s do our best to keep it safe and fun. Click the link below for my video about handlebar width.
See you on the trails!!


Comments